Disabling Windows Defender
Melonity is using a new method of injecting chits into the game. Each time you run the console launcher, the old file will be deleted and then a new file will be created with a random name. Each build is unique and generated for you.
This system has a number of advantages, and also provides a significant increase to the security of the read. But it does not allow you to send the launcher file to antivirus databases to check it. It is because of this that false detections occur.
1- Quick way to disable Windows Defender
1) Open Task Manager and check for "Antimalware Service Executable" and "Antimalware Core Service" processes.

2) Download the Defender Killer utility from one of the following links: Mega , Media fire
3) Unpack the DefenderKiller.rar archive into the root folder of your system, for example: C:\Defender Killer

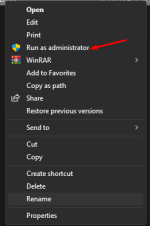
4) Run the file "DefenderKiller.bat" as administrator by right-clicking on it.

5) In the window that opens, type the number 1 and press Enter.

6) At the prompt to create a backup, select "Yes".
7) Windows Defender uninstallation will start, you will close Explorer (start menu, folders, etc.) Wait for the process to finish.
8) After this process is finished, open Task Manager and check for the presence of "Antimalware Service Executable" and "Antimalware Core Service" processes.
If these processes are not present, the removal has been performed correctly, if the processes are not missing - reboot the computer
If these processes are missing, the uninstallation was correct, if the processes are not missing - restart the computer and repeat the uninstallation.
2. Manual way to disable Windows Defender
1) Go to the "Windows Defender Security Center". This can be done by double-clicking on the defender icon in the notification area on the bottom right and selecting "Open", or in Settings - Updates and Security - Windows Defender - "Open Windows Defender Security Center" button.
2) In the Security Center, select the Windows Defender settings page - "Virus and Threat Protection" item (shield icon), and then click "Manage Settings" under "Virus and Other Threat Protection Settings".
3) Disable "Real-time protection" and "Cloud protection".
2.1 Disabling Windows 10 Defender in the Local Group Policy Editor
1) Press Win+R on your keyboard and type gpedit.msc
2) In the Local Group Policy Editor that opens, navigate to "Computer Configuration" - "Administrative Templates" - "Windows Components" - "Windows Defender antivirus program".
3) Double-click on the "Disable Windows Defender antivirus program" setting and select "Enabled" (that's right - "Enabled" will disable the antivirus).
4) Similarly, disable the "Allow Malware Protection Service to run" and "Allow Malware Protection Service to run continuously" settings (set to "Disabled").
5) Go to the "Real-time protection" subsection, double-click on the "Turn off real-time protection" parameter and set it to "Enabled".
6) Additionally, disable the "Check all downloaded files and attachments" parameter
7) In the "MAPS" subsection, disable all parameters except "Send sample files".
8) For "Send file samples if further analysis is required", set "Enabled" and at the bottom left (in the same policy settings window) set "Never send".
2.2 Disabling Windows 10 Defender in the Registry Editor
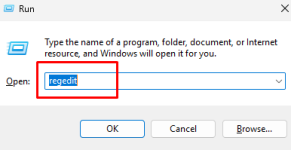
1) Press Win+R, type regedit and press Enter.

2) In the registry editor, navigate to the section
HKEY_LOCAL_MACHINE\SOFTWARE\Policies\Microsoft\Windows Defender
3) On the right side of the registry editor, right-click, select "Create" - "DWORD 32 bit parameter" (even if you have a 64-bit system) and name the parameter DisableAntiSpyware.

4) After creating the parameter, double click on it and set the value to 1.
5) Create the AllowFastServiceStartup and ServiceKeepAlive parameters in the same place - their value should be 0 (zero, set by default).
6) In the Windows Defender section, select the Real-Time Protection subsection (or create it), and in it create settings named DisableIOAVProtection and DisableRealtimeMonitoring
7) Double click on each of these settings and set the value to 1.
8) Under Windows Defender, create a Spynet subsection and in it create DWORD32 parameters named DisableBlockAtFirstSeen (value 1), LocalSettingOverrideSpynetReporting (value 0), SubmitSamplesConsent (value 2). This action disables cloud verification and blocking of unknown programs.
9) Restart Windows 10 in safe mode, go to the registry editor (Win+R keys, type regedit) and navigate to the section How to enter safe mode
HKEY_LOCAL_MACHINE\SYSTEM\CurrentControlSet\Services\WinDefend
Double-click the Start parameter in the right pane of the Registry Editor and set it to 4.
10) Apply the settings, close the registry editor, and restart your computer normally.
Melonity is using a new method of injecting chits into the game. Each time you run the console launcher, the old file will be deleted and then a new file will be created with a random name. Each build is unique and generated for you.
This system has a number of advantages, and also provides a significant increase to the security of the read. But it does not allow you to send the launcher file to antivirus databases to check it. It is because of this that false detections occur.
1- Quick way to disable Windows Defender
1) Open Task Manager and check for "Antimalware Service Executable" and "Antimalware Core Service" processes.

2) Download the Defender Killer utility from one of the following links: Mega , Media fire
3) Unpack the DefenderKiller.rar archive into the root folder of your system, for example: C:\Defender Killer

4) Run the file "DefenderKiller.bat" as administrator by right-clicking on it.

5) In the window that opens, type the number 1 and press Enter.

6) At the prompt to create a backup, select "Yes".
7) Windows Defender uninstallation will start, you will close Explorer (start menu, folders, etc.) Wait for the process to finish.
8) After this process is finished, open Task Manager and check for the presence of "Antimalware Service Executable" and "Antimalware Core Service" processes.
If these processes are not present, the removal has been performed correctly, if the processes are not missing - reboot the computer
If these processes are missing, the uninstallation was correct, if the processes are not missing - restart the computer and repeat the uninstallation.
2. Manual way to disable Windows Defender
1) Go to the "Windows Defender Security Center". This can be done by double-clicking on the defender icon in the notification area on the bottom right and selecting "Open", or in Settings - Updates and Security - Windows Defender - "Open Windows Defender Security Center" button.
2) In the Security Center, select the Windows Defender settings page - "Virus and Threat Protection" item (shield icon), and then click "Manage Settings" under "Virus and Other Threat Protection Settings".
3) Disable "Real-time protection" and "Cloud protection".
2.1 Disabling Windows 10 Defender in the Local Group Policy Editor
1) Press Win+R on your keyboard and type gpedit.msc
2) In the Local Group Policy Editor that opens, navigate to "Computer Configuration" - "Administrative Templates" - "Windows Components" - "Windows Defender antivirus program".
3) Double-click on the "Disable Windows Defender antivirus program" setting and select "Enabled" (that's right - "Enabled" will disable the antivirus).
4) Similarly, disable the "Allow Malware Protection Service to run" and "Allow Malware Protection Service to run continuously" settings (set to "Disabled").
5) Go to the "Real-time protection" subsection, double-click on the "Turn off real-time protection" parameter and set it to "Enabled".
6) Additionally, disable the "Check all downloaded files and attachments" parameter
7) In the "MAPS" subsection, disable all parameters except "Send sample files".
8) For "Send file samples if further analysis is required", set "Enabled" and at the bottom left (in the same policy settings window) set "Never send".
2.2 Disabling Windows 10 Defender in the Registry Editor
1) Press Win+R, type regedit and press Enter.

2) In the registry editor, navigate to the section
HKEY_LOCAL_MACHINE\SOFTWARE\Policies\Microsoft\Windows Defender
3) On the right side of the registry editor, right-click, select "Create" - "DWORD 32 bit parameter" (even if you have a 64-bit system) and name the parameter DisableAntiSpyware.

4) After creating the parameter, double click on it and set the value to 1.
5) Create the AllowFastServiceStartup and ServiceKeepAlive parameters in the same place - their value should be 0 (zero, set by default).
6) In the Windows Defender section, select the Real-Time Protection subsection (or create it), and in it create settings named DisableIOAVProtection and DisableRealtimeMonitoring
7) Double click on each of these settings and set the value to 1.
8) Under Windows Defender, create a Spynet subsection and in it create DWORD32 parameters named DisableBlockAtFirstSeen (value 1), LocalSettingOverrideSpynetReporting (value 0), SubmitSamplesConsent (value 2). This action disables cloud verification and blocking of unknown programs.
9) Restart Windows 10 in safe mode, go to the registry editor (Win+R keys, type regedit) and navigate to the section How to enter safe mode
HKEY_LOCAL_MACHINE\SYSTEM\CurrentControlSet\Services\WinDefend
Double-click the Start parameter in the right pane of the Registry Editor and set it to 4.
10) Apply the settings, close the registry editor, and restart your computer normally.
Last edited:

